
The beautiful UI platform used by the Atom editor:

List current workspaces for your user:
C:\temp>tf workspaces /collection:tfs.hostname/tfs/ /login:\, Collection: http://tfs.hostname/tfs
Workspace Owner Computer Comment
------------ ------------ --------- -------------------------------------------------------------
CODE1 Dustin Oprea DUSTIN-PC
Map a new one locally:
C:\temp>mkdir test-workspace
C:\temp>cd test-workspace
C:\temp\test-workspace>tf workspace /new /noprompt test-workspace /collection:<TFS URL PREFIX>/<COLLECTION NAME> /login:<DOMAIN>\<USERNAME>,<PASSWORD>
C:\temp\test-workspace>tf workfold /map "$/<PROJECT NAME>" test-workspace
Populate it:
C:\temp\test-workspace>tf get "$/<PROJECT NAME>" /Recursive
If you want to dispose of it, then, first, unmap it:
C:\temp\test-workspace>cd ..
C:\temp>tf workfold /unmap test-workspace /workspace:test-workspace /login:<DOMAIN>\<USERNAME>,<PASSWORD>
C:\temp>tf workspace /delete /noprompt test-workspace
Now, recursively delete the workspace directory.
This is a natural extension of the above:
If you’d like to list workspaces pass the TFS user as the owner:
C:\>tf workspaces /computer:<COMPUTER NAME> /collection:<TFS URL PREFIX>/<COLLECTION NAME> /owner:<OWNER NAME>
Collection: <TFS URL PREFIX>/<COLLECTION NAME>
Workspace        Owner               Computer   Comment
---------------- ------------------- ---------- --------------------------------------------------------------------------------------
<WORKSPACE NAME> <OWNER NAME> <COMPUTER NAME> Workspace Created by Team Build
Delete the workspace mentioned in the error or found via the listing:
C:\>tf workspace /delete /collection:<TFS URL PREFIX>/<COLLECTION NAME> <WORKSPACE NAME>;<OWNER NAME>
I have a port forwarded from another host to my local port 80. Of course this is occasionally problematic as I have other things that also want to use port 80. Unfortunately, I have some projects that embed some URLs to point to port 80. So, I simply stop and start the various port 80 services as required. Unfortunately, sometimes everything is fine and other times I end-up with port 80 being bound by an unidentifiable running process seemingly no matter how often I restart, even when I’ve made sure that there are no port-80 sites in my IIS. I inexplicably don’t often run into this problem (it seems like I should).
netstat indicates that a process with PID 4 is bound to it but can’t give me its name (this is an elevated prompt):

TCPView says that it’s actual “System” (read: Windows):

However, it turns out that it’s the “World Wide Web Publishing Service”. Turn it off (or disable it, sue Microsoft for damages, etc..):

You’ll be all set. Why does this service want port 80 when none of my sites are configured to use port 80? We’ll file it under “$!?!!%” for now.
On Ubuntu, install pv using Apt:
$ sudo apt-get install pv
Usage:
$ dd if=<FROM FILEPATH> | pv | dd of=<TO FILEPATH>

1,86MB 0:00:14 [ 174kB/s] [      <=>                               ]
You can also pass --size with an estimated-size to show a progress bar and estimated time of completion.
Sometimes it’s very useful for testing just to hit a private NuGet server directly. So, here is two methods.
Find-Package -Source <SERVER URL>
nuget list -Source <SERVER URL>
The cross-platform TFX tool is, among other things, what you use to create new boiler-plate VSIX extensions (to populate with your own information) as well as to upload individual Release Management (vNext) tasks to TFS 2015. Previously, I’ve logged in using a fully-qualified UNC-formatted username (\domain\dustin.oprea) but this started, suddenly, not working for me. I have not applied any noteworthy updates. I did recently have to change my password (per group policy), but that may or may not have affected it.
As my web-based TFS UI indicated that I was logged-in as “DOMAIN\dustin.oprea”, I unsuccessfully tried logging in as that at the command-line. Eventually, I opened up a private session within the browser in order to log-in using that same username but the UI refused to log me out (even though it was a private session, I was always logged-in). I tried clearing web credential in Windows, but, alas, nothing was stored there (if that could’ve even helped).
I also restarted the system just in case there was credentials-related caching in the system, in or outside of TFS’ application pool.
It turns out that now logging-in with a fully-qualified email-account as my username works just fine.
For example:
C:\>tfx login --auth-type basic --service-url http://localhost:8181/tfs/DefaultCollection --username dustin@email.com
TFS Cross Platform Command Line Interface v0.3.20
Copyright Microsoft Corporation
> Password:
Logged in successfully
Thanks, TFS. Do you think you might unify how users are logging-in both at the command-line and in the UI? Maybe?
Thanks to Could Not Connect, Invalid Credentials, Bad Username/ID/Password for drawing my eye to this potential option.
I noticed a problem in the “find” version being delivered in the currently available GnuWin32. I have csproj files strewn throughout a tree. Most of the sln files are in the root. I can search for csproj‘s but I get an error with sln‘s.
D:\sc_root>c:\gnu\find . -name "*.csproj"
<...>
^C

D:\sc_root>c:\gnu\find . -name "*.sln"
c:\gnu\find: paths must precede expression
Usage: c:\gnu\find [-H] [-L] [-P] [path...] [expression]
Of course I’m already using quotes to prevent premature expansion but it’s not making a difference.
It looks like this might be a recent bug. If you sabotage Windows’ ability to expand before find can process the expression by using something Windows can’t understand, then it’ll work just fine:
c:\sc_root>c:\gnu\find . -name "*[.]sln"
<...>
Special thanks for this SO post.
A very useful and illuminating article:
MSBuild: PropertyGroup, ItemGroup, Item Metadata, and crazy $@% syntax
It also expertly articulates a common feeling:
It brings me great joy that the title of this blog post is both technically accurate and evokes the type of comic-book language I use when trying to figure out MSBuild variable syntax.
It expounds on how to express discrete items, lists, and dictionaries as well as how to refer to them; even implicitly looping over collections.
At the high-level:
It’s worth mentioning that %(VariableName) will not expand in such a way that it would result in doing the same thing twice.
For example, I have a list of two assemblies and two XML files of the same two names and would like to print them:
<Target Name="BeforeBuild">
  <ItemGroup>
    <File Include="$(MSBuildProjectDirectory)\AncillaryAssemblies\*.*" />
  </ItemGroup>
  <Message Text="Inner file: %(File.Filename)" />
</Target>
Output:
1>  Inner file: EntityFramework
1>  Inner file: EntityFramework.SqlServer
However, if I were to print the extensions, as well:
<Target Name="BeforeBuild">
  <ItemGroup>
    <File Include="$(MSBuildProjectDirectory)\AncillaryAssemblies\*.*" />
  </ItemGroup>
  <Message Text="Inner file: %(File.Filename) %(File.Extension)" />
</Target>
Output:
1>  Inner file: EntityFramework .dll
1>  Inner file: EntityFramework.SqlServer .dll
1>  Inner file: EntityFramework.SqlServer .xml
1>  Inner file: EntityFramework .xml
Something to keep in mind.
ClickOnce equips your published application to be able to check for updates and to, optionally, do the update automatically. See this post for more information.
To invoke this functionality from either the command-line or your build definition/process, you need to pass some additional project parameters to MSBuild.
ApplicationVersion (e.g. 1.0.1.6)
InstallUrl (e.g. http://clickonce.localhost/consoletestfrombuild/)
UpdateUrl (e.g. http://clickonce.localhost/consoletestfrombuild/)
PublishUrl (e.g. http://clickonce.localhost/consoletestfrombuild/)
UpdateEnabled (e.g. true)
UpdateMode (e.g. Foreground)
ProductName (e.g. TestConsoleApplication)
There is some disagreement as to whether the “ProductName” parameter is necessary.
The corresponding set of MSBuild arguments using the example values:
/target:publish /p:ApplicationVersion=1.0.1.6 /p:InstallUrl=http://clickonce.localhost/consoletestfrombuild/ /p:UpdateUrl=http://clickonce.localhost/consoletestfrombuild/ /p:PublishUrl=http://clickonce.localhost/consoletestfrombuild/ /p:UpdateEnabled=true /p:UpdateMode=Foreground /p:ProductName=TestConsoleApplication
If your polling locations are going to be UNCs (“\\path\\file”) rather than URLs then you’ll have to pass an additional argument:
/p:IsWebBootstrapper=false
To configure this under a TFS 2015 build-definition, simply add the parameters to the “MSBuild Arguments” field:

Building ClickOnce Applications from the Command Line (Microsoft)
Deploying a click-once application with build vNext in Azure Blob Storage

ClickOnce functionality allows you to create an application that checks for updates. It can do this before it starts (you’ll always run with the latest version, even if you will see the update-check when it starts) or after it starts (better for large updates). When you’re publishing, you can also specify the minimum acceptable version that is to be running, which will automatically do the update when in violation. It obviously follows that you can also specify whether the application is allowed to be run when offline (read: when it can’t check for updates).
Though most aspects of Microsoft development are unnecessarily complicated this is ridiculously easy.
Open project properties and go to the “Signing” panel:

Check the “Sign the ClickOnce manifests” checkbox. Click the “Create Test Certificate…” button and create a self-signed certificate (you can create an official one after you adopt and formalize the process):

Navigate to the “Publish” panel and fill in the path to push files and the UNC/URL that that directory can be accessed at for update polling and downloads:

Click on the “Updates…” button and check “The application should check for updates”. Make sure to change where in the lifecycle the update should be performed if the default doesn’t work for you. Check “Specify a minimum required version for this application” and set that version if you want the update to be automatic. When you enable this for the first time, it will likely default to the version that is currently set to publish:

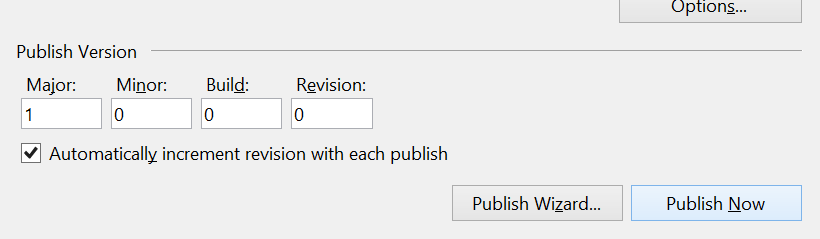
Back in the top “Publish” panel, click on “Publish Now”. You may change the version factors of what you’re publishing, but, as the “Automatically increment revision with each publish” checkbox is checked by default, you shouldn’t have to:
An Explorer window with the published files will probably be opened for you:

Go ahead and click setup.exe to install. Forgive the unsigned-publisher security warning:

You’ll also be presented with a security warning due to the self-signed certificate. Click on “More info” to expose the “Run anyway” button and then click it:

Go ahead and do another publish (it’ll automatically push using a higher version than last time). Run the application. You’ll be prompted to update unless you changed the minimum-version in order to install automatically:


You must be logged in to post a comment.