
BoringSSL:
Projects

Serving a Beautiful Website with R and Bootstrap

There is very limited coverage on how to build a website with R. It was a fight to answer the questions that I had. Obviously, this is because R was not meant to serve websites. In fact, if you want to serve a website that has any sort of volume, you’re probably better-off using Shiny Server or hosted Shinyapps.io: http://shiny.rstudio.com/deploy
However, you still may want to write your own R-based web application for one or more of the following reasons:
- You just want to (I fit into this category)
- You want more control over the web code, as Shiny will dynamically generate the code for you. Shiny may look spectacular, but at the cost of losing a lot of control (for good reason).
- You want to run more than one application and don’t want to pay the $10,000/year price for each Shiny server instance.
- You don’t want to pay for a hosted solution or subject yourself to the limits of a free account (your application will be deactivated after the first twenty-five hours of active usage each month).
So, assuming that you just want to run your own server, I’ve created a test-project to help you out. Make sure to install the requirements before running it. The project depends on the DAAG package. This is a companion package to a book that we use for the dataset in a spline example.
This project was created on top of Rook, a fairly low-level R package that removes most of the semantics of serving web-requests while still leaving you buried in the flow. This was brought about by Jeffrey Horner who had previously introduced both rApache and Brew. He was also involved in Shiny Server’s implementation.
We’ll include a couple of excerpts from the project, here. For more information on running the example project, go to the project website.
The main routing code:
#!/usr/bin/env Rscript

library(Rook)

source('ajax.r')

main.app <- Builder$new(
    # Static assets (images, Javascript, CSS)
    Static$new(
        urls = c('/static'),
        root = '.'
    ),

    # Webpage serving.
    Static$new(urls='/html',root='.'),

    Rook::URLMap$new(
        '/ajax/lambda/result' = lambda.ajax.handler,
        '/ajax/lambda/image' = lambda.image.ajax.handler,
        '/' = Redirect$new('/html/index.html')
    )
)

s <- Rhttpd$new()
s$add(name='test_project',app=main.app)

s$start(port=5000)

while (TRUE) {
    Sys.sleep(0.5);
}
We loop at the bottom because, if you’re calling this as a script as intended, we want to keep it running in order to process requests.
The dynamic-request handlers:
library(jsonlite)
library(base64enc)

source('utility.r')

eval.code <- function(code, result_name=NULL) {
    message <- NULL
    cb_error <- function(e) {
        message <<- list(type='error', message=e$message)
    }
    cb_warning <- function(w) {
        message <<- list(type='warning', message=w$message)
    }

    tryCatch(eval(parse(text=code)), error=cb_error, warning=cb_warning)

    if(is.null(message)) {
        result <- list(success=TRUE)

        if(is.null(result_name) == FALSE) {
            if(exists(result_name) == FALSE) {
                result$found <- FALSE
            } else {
                result$found <- TRUE
                result$value <- mget(result_name)[[result_name]]
            }
        }

        return(result)
    } else {
        return(list(success=FALSE, message=message))
    }
}

lambda.ajax.handler <- function(env) {
    # Execute code and return the value for the variable of the given name.

    req <- Request$new(env)

    if(is.null(req$GET()$tab_name)) {
        # Parameters missing.
        res <- Response$new(status=500)
        write.text(res, "No 'tab_name' parameter provided.")
    } else if(is.null(req$GET()$result_name)) {
        # Parameters missing.
        res <- Response$new(status=500)
        write.text(res, "No 'result_name' parameter provided.")
    } else if(is.null(req$POST())) {
        # Body missing.
        res <- Response$new(status=500)
        write.text(res, "POST-data missing. Please provide code.")
    } else {
        # Execute code and return the result.

        res <- Response$new()

        result_name <- req$GET()$result_name
        code <- req$POST()[['code']]

        execution_result <- eval.code(code, result_name=result_name)
        execution_result$value = paste(capture.output(print(execution_result$value)), collapse='n')

        write.json(res, execution_result)
    }

    res$finish()
}

lambda.image.ajax.handler <- function(env) {
    # Execute code and return a base64-encoded image.

    req <- Request$new(env)

    if(is.null(req$GET()$tab_name)) {
        # Parameters missing.
        res <- Response$new(status=500)
        write.text(res, "No 'tab_name' parameter provided.")
    } else if(is.null(req$POST())) {
        # Body missing.
        res <- Response$new(status=500)
        write.text(res, "POST-data missing. Please provide code.")
    } else {
        # Execute code and return the result.

        # If we're returning an image, set the content-type and redirect
        # the graphics device to a file.

        t <- tempfile()
        png(file=t)
        png(t, type="cairo", width=500, height=500)

        result_name <- req$GET()$result_name
        code <- req$POST()[['code']]

        execution_result <- eval.code(code, result_name=result_name)

        # If we're returning an image, stop the graphics device and return
        # the data.

        dev.off()
        length <- file.info(t)$size

        if(length == 0) {
            res <- Response$new(status=500)
            res$header('Content-Type', 'text/plain')

            res$write("No image was generated. Your code is not complete.")
        } else {
            res <- Response$new()
            res$header('Content-Type', 'text/plain')

            data_uri <- dataURI(file=t, mime="image/png")
            res$write(data_uri)
        }
    }

    res$finish()
}
For reference, there is also another project called rapport that lets you produce HTML though not whole websites.
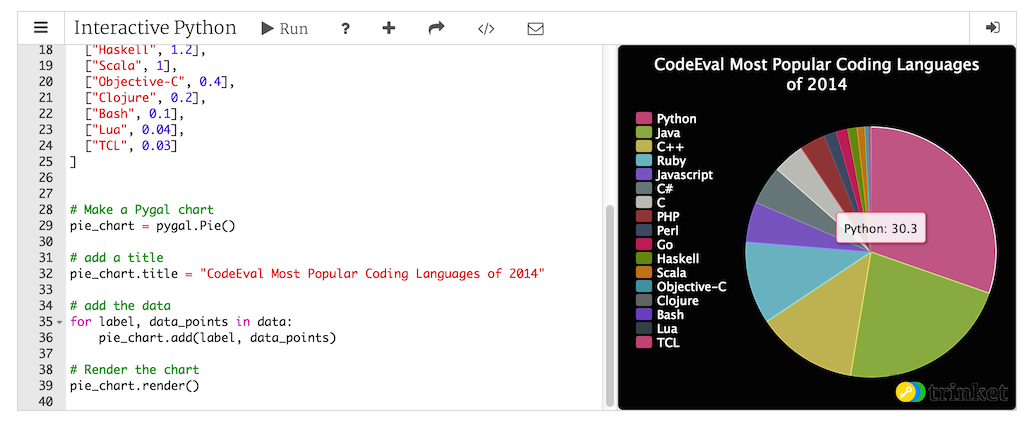
Python In-Browser Javascript Implementation
Run Python completely in the browser with Skulpt:

trinket.io for interactive Python from a website:
Interactive [any language] interpreter from a website with repl.it:

Very Easy, Pleasant, Secure, and Python-Accessible Distributed Storage With Tahoe LAFS
Tahoe is a file-level distributed filesystem, and it’s a joy to use. “LAFS” stands for “Least Authority Filesystem”. According to the homepage:
Even if some of the servers fail or are taken over by an attacker, the
entire filesystem continues to function correctly, preserving your privacy
and security.
Tahoe comes built-in with a beautiful UI, and can be accessed via it’s CLI (using a syntax similar to SCP), via REST (that’s right), or from Python using pyFilesystem (an abstraction layer that also works with SFTP, S3, FTP, and many others). Tahoe It gives you very direct control over how files are sharded/replicated. The shards are referred to as shares.
Tahoe requires an “introducer” node that announces nodes. You can easily do a one-node cluster by installing the node in the default ~/.tahoe directory, the introducer in another directory, and dropping the “share” configurables down to 1.
Installing
Just install the package:
$ sudo apt-get install tahoe-lafs
You might also be able to install directly using pip (this is what the Apt version does):
$ sudo pip install allmydata-tahoe
Configuring as Client
- Provisioned client:
$ tahoe create-client
- Update ~/.tahoe/tahoe.cfg:
# Identify the local node.
nickname =

# This is the furl for the public TestGrid.
introducer.furl = pb://hckqqn4vq5ggzuukfztpuu4wykwefa6d@publictestgrid.e271.net:50213,198.186.193.74:50213/introducer
- Start node:
$ bin/tahoe start
Web Interface (WUI):
The UI is available at http://127.0.0.1:3456.
To change the UI to bind on all ports, update web.port:
web.port = tcp:3456:interface=0.0.0.0
CLI Interface (CLI):
To start manipulating files with tahoe, we need an alias. Aliases are similar to anonymous buckets. When you create an alias, you create a bucket. If you misplace the alias (or the directory URI that it represents), you’re up the creek. It’s standard-operating-procedure to copy the private/aliases file (in your main Tahoe directory) between the various nodes of your cluster.
- Create an alias (bucket):
$ tahoe create-alias tahoe
We use “tahoe” since that’s the conventional default.
-
Manipulate it:
$ tahoe ls tahoe:
$
The tahoe command is similar to scp, in that you pass the standard file management calls and use the standard “colon” syntax to interact with the remote resource.
If you’d like to view this alias/directory/bucket in the WUI, run “tahoe list-aliases” to dump your aliases:
# tahoe list-aliases
  tahoe: URI:DIR2:xyzxyzxyzxyzxyzxyzxyzxyz:abcabcabcabcabcabcabcabcabcabcabc
Then, take the whole URI string (“URI:DIR2:xyzxyzxyzxyzxyzxyzxyzxyz:abcabcabcabcabcabcabcabcabcabcabc”), plug it into the input field beneath “OPEN TAHOE-URI:”, and click “View file or Directory”.
Configuring as Peer (Client and Server)
First, an introducer has to be created to announce the nodes.
Creating the Introducer
$ mkdir tahoe_introducer
$ cd tahoe_introducer/
~/tahoe_introducer$ tahoe create-introducer .

Introducer created in '/home/dustin/tahoe_introducer'

$ ls -l
total 8
-rw-rw-r-- 1 dustin dustin 520 Sep 16 13:35 tahoe.cfg
-rw-rw-r-- 1 dustin dustin 311 Sep 16 13:35 tahoe-introducer.tac

# This is a introducer-specific tahoe.cfg . Set the nickname.
~/tahoe_introducer$ vim tahoe.cfg

~/tahoe_introducer$ tahoe start .
STARTING '/home/dustin/tahoe_introducer'

~/tahoe_introducer$ cat private/introducer.furl
pb://wa3mb3l72aj52zveokz3slunvmbjeyjl@192.168.10.108:58294,192.168.24.170:58294,127.0.0.1:58294/5orxjlz6e5x3rtzptselaovfs3c5rx4f
Configuring Client/Server Peer
- Create the node:
$ tahoe create-node
- Update configuration (~/.tahoe/tahoe.cfg).
- Set
nicknameandintroducer.furlto the furl of the introducer, just above. - Set the
sharesconfig. We’ll only have one node for this example, soneededrepresents the number of pieces required to rebuild a file,happyrepresents the number of pieces/nodes required to perform a write, andtotalrepresents the number of pieces that get created:shares.needed = 1 shares.happy = 1 shares.total = 1
You may also wish to set the
web.portitem as we did in the client section, above.
- Set
-
Start the node:
$ tahoe start
STARTING '/home/dustin/.tahoe'
- Test a file-operation:
$ tahoe create-alias tahoe
Alias 'tahoe' created

$ tahoe ls

$ tahoe cp /etc/fstab tahoe:
Success: files copied

$ tahoe ls
fstab
Accessing From Python
- Install the Python package:
$ sudo pip install fs
- List the files:
import fs.contrib.tahoelafs

dir_uri = 'URI:DIR2:um3z3xblctnajmaskpxeqvf3my:fevj3z54toroth5eeh4koh5axktuplca6gfqvht26lb2232szjoq'
webapi_url = 'http://yourserver:3456'

t = fs.contrib.tahoelafs.TahoeLAFS(dir_uri, webapi=webapi_url)
files = t.listdir()
This will render a list of strings (filenames). If you don’t provide
webapi, the local system and default port are assumed.
Troubleshooting
If the logo in the upper-lefthand corner of the UI doesn’t load, try doing the following, making whatever path adjustments are necessary in your environment:
$ cd /usr/lib/python2.7/dist-packages/allmydata/web/static
$ sudo mkdir img && cd img
$ sudo wget https://raw.githubusercontent.com/tahoe-lafs/tahoe-lafs/master/src/allmydata/web/static/img/logo.png
$ tahoe restart
This is a bug, where the image isn’t being included in the Python package:
logo.png is not found in allmydata-tahoe as installed via easy_install and pip
If you’re trying to do a copy and you get an AssertionError, this likely is a known bug in 1.10.0:
# tahoe cp tahoe:fake_data .
Traceback (most recent call last):
  File "/usr/lib/python2.7/dist-packages/allmydata/scripts/runner.py", line 156, in run
    rc = runner(sys.argv[1:], install_node_control=install_node_control)
  File "/usr/lib/python2.7/dist-packages/allmydata/scripts/runner.py", line 141, in runner
    rc = cli.dispatch[command](so)
  File "/usr/lib/python2.7/dist-packages/allmydata/scripts/cli.py", line 551, in cp
    rc = tahoe_cp.copy(options)
  File "/usr/lib/python2.7/dist-packages/allmydata/scripts/tahoe_cp.py", line 770, in copy
    return Copier().do_copy(options)
  File "/usr/lib/python2.7/dist-packages/allmydata/scripts/tahoe_cp.py", line 451, in do_copy
    status = self.try_copy()
  File "/usr/lib/python2.7/dist-packages/allmydata/scripts/tahoe_cp.py", line 512, in try_copy
    return self.copy_to_directory(sources, target)
  File "/usr/lib/python2.7/dist-packages/allmydata/scripts/tahoe_cp.py", line 672, in copy_to_directory
    self.copy_files_to_target(self.targetmap[target], target)
  File "/usr/lib/python2.7/dist-packages/allmydata/scripts/tahoe_cp.py", line 703, in copy_files_to_target
    self.copy_file_into(source, name, target)
  File "/usr/lib/python2.7/dist-packages/allmydata/scripts/tahoe_cp.py", line 748, in copy_file_into
    target.put_file(name, f)
  File "/usr/lib/python2.7/dist-packages/allmydata/scripts/tahoe_cp.py", line 156, in put_file
    precondition(isinstance(name, unicode), name)
  File "/usr/lib/python2.7/dist-packages/allmydata/util/assertutil.py", line 39, in precondition
    raise AssertionError, "".join(msgbuf)
AssertionError: precondition: 'fake_data' <type 'str'>
Try using a destination filename/filepath rather than just a dot.
See Inconsistent ‘tahoe cp’ behavior for more information.
Song Tags/Beats/Timing and Other Metadata
An awesome, free initiative called the Million Song Dataset. It’s a great candidate dataset for a MapReduce project, and a great start if you want to write your own song-recognition algorithm.
Doing Proper Encryption with Rijndael using [Pure] Python
When it comes to writing code that portably encrypts and decrypts without concern for the platform, you’ll have to overcome a couple of small factors with Python:
- You’ll have to install a cryptography library
- You’ll need code that doesn’t need a build environment (no C-code)
I personally prefer Rijndael (also called “AES” when you constrain yourself to certain key-sizes and/or block-sizes) as an affordable, ubiquitous algorithm. There was a remarkable amount of difficulty in finding a pure-Python algorithm that worked in both Python 2 and Python 3.
By mentioning “proper” encryption in the title, I was referring to “key derivation” (also called “key expansion”). It’s not enough to have a password and an algorithm. Unless you already have a sufficiently random key of exactly the right number of bits, you’ll need to submit the password to a key-expansion algorithm in order to generate a key of the right length. This is often done using the PBKDF2 algorithm.
It was difficult to find a Python 2 and 3 version of PBKDF2 as well.
I’ve posted the pprp package, which packages Python 2 and Python 3 versions of Rijndael and PBKDF2 and automatically chooses the right version during module-load. As I implement PKCS7 for padding, I also include a utility function to trim the padding.
The main documentation provides the following as an example:
import io
import os.path
import hashlib

import pprp

def trans(text):
    return text.encode('ASCII') if sys.version_info[0] >= 3 else text

passphrase = trans('password')
salt = trans('salt')
block_size = 16
key_size = 32
data = "this is a test" * 100

key = pprp.pbkdf2(passphrase, salt, key_size)

def source_gen():
    for i in range(0, len(data), block_size):
        block = data[i:i + block_size]
        len_ = len(block)

        if len_ > 0:
            yield block.encode('ASCII')

        if len_ < block_size:
            break

# Pump the encrypter output into the decrypter.
encrypted_gen = pprp.rjindael_encrypt_gen(key, source_gen(), block_size)

# Run, and sink the output into an IO stream. Trim the padding off the last
# block.

s = io.BytesIO()
ends_at = 0
for block in pprp.rjindael_decrypt_gen(key, encrypted_gen, block_size):
    ends_at += block_size
    if ends_at >= len(data):
        block = pprp.trim_pkcs7_padding(block)

    s.write(block)

decrypted = s.getvalue()
assert data == decrypted.decode('ASCII')
Writing and Reading 7-Zip Archives From Python
I don’t often need to read or write archives from code. When I do, and I don’t want to call a tool via shell-commands, I’ll use zip-files. Obviously there are better formats out there, but when it comes to library compatibility, tar and zip are the easiest possible formats to manipulate. If you’re desperate, you can even write a quick tar archiver with relative simplicity (the headers are mostly ASCII).
Obviously, the emphasis here has been on availability. My preferred format is 7-Zip (which uses LZMA compression). Though you don’t often see 7-Zip archives for download, I’ve been using this format for eight-years and haven’t looked back. The compression is good and the tool is every bit as easy as zip.
Unfortunately, there’s limited support for 7-Zip in Python. To the best of my knowledge, only the libarchive Python package can read and write 7-Zip archives. The libarchive Python package is developed and supported separately from the C library that it implements.
Though the library is structured to support any format that the libarchive library can (all major formats, and probably all of the minor ones), the Python project is outrightly labeled as a work-in-progress. 7-Zip is the only format explicitly supported for both reading and writing. Fortunately, it also supports libarchive‘s autodetection functionality. So, you can read/expand any archive, as long as you can afford the extra couple of milliseconds that the detection will cost you.
The focus of this project is to provide elegant archiving routines. Most of the API functions are implemented as generators.
Example
To enumerate the entries in an archive:
import libarchive

with libarchive.reader('test.7z') as reader:
    for e in reader:
        # (The entry evaluates to a filename.)
        print("> %s" % (e))
To extract the entries from an archive to the current directory (like a normal, Unix-based extraction):
import libarchive

for state in libarchive.pour('test.7z'):
    if state.pathname == 'dont/write/me':
        state.set_selected(False)
        continue

    # (The state evaluates to a filename.)
    print("Writing: %s" % (state))
To build an archive from a collection of files (omit the target for stdout):
import libarchive

for entry in libarchive.create(
                '7z',
                ['/aa/bb', '/cc/dd'],
                'create.7z'):
    print("Adding: %s" % (entry))
New Tesseract OCR C Library
Tesseract is a terrific, trainable (optionally) OCR library currently maintained by Google. However, the only currently-sufficient way to use it from Python is via python-tesseract (a third-party library), and it has two flaws.
The first flaw is that python-tesseract is based on SWIG, and it introduces a lot more code. The second is that the functions may not be functionally compatible. For example, Tesseract will let you iterate through a document by “level” (word, line, paragraph, block, etc..), and allow you to incorporate its layout analysis into your application. This is useful if you need to extract parts of a document based on proximity (or, possibly, location). However, python-tesseract does not currently let you iterate through parts of the document: GetIterator() does not accept a level argument.
So, as a first step to producing a leaner and more analogous Python library, I just released CTesseract: a C-based adapter shared-library that connects to the C++ Tesseract shared-library.
Preventing Lost Documents in gedit
I’ve just uploaded a plugin for “gedit” that will automatically, temporarily store unsaved documents under your home directory (~/.gedit-unsaved). A temporary file will be deleted, automatically, when the document that it represents is explicitly saved by the user. All temporary files will be cleaned-up from time to time.
Putting PyPI Download Counts on Your Webpage
I just uploaded a jQuery widget to allow the download counts for a PyPI package to be displayed on a webpage.
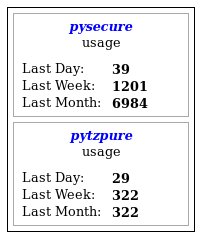
Place a tag like the following:
<div id="pypi-display-pysecure" data-package="pysecure"></div>
Invoke the “pypi” plugin:
$("#pypi-display-pysecure").pypi()
That’s it.

You must be logged in to post a comment.