
Tutorial for installing and configuring SoundFlower on OSX. With SoundFlower, you can loop system sound output into a SoundFlower device and record it directly to file.
Author: dustin
Using Tokenization (Token Replacement) for Builds/Releases in vNext/TFS 2015
Microsoft has provided support for doing token replacements into build artifacts. Since this is provided as a “utility” task there’s no bias in how it’s used but you’ll likely find it most useful from your release workflow.
Inexplicably, Microsoft doesn’t actually provide this with TFS. Rather, you need to use their marketplace to download and install it. Still, as far as boneheaded designs go, it’s not so bad.
There are three things that it allows you to do:
- Do string-replacements using the environment.
- Do string-replacements using the environment-specific dictionary from the configuration file.
- Do environment-specific XPath replacements.
Note that:
- (1) and (2) will expect to find tokens that look like “[A-Za-z0-9._-]*” (e.g. “XYZ“, “ABC_DEF“, “GHI.JKL“, “MNO-PQR“), remove the underscores on the margins, and translate the periods to underscores.
- (2) and (3) are only possible if you provide a configuration file and if the source file is XML (obviously).
Installation
Download the Release Management Utility tasks extension (as a VSIX file). Install it using the instructions from my other post. You’ll now see a “Tokenize with XPath/Regular expressions” utility task.
For reference, this is the original project URL:
Usage
The configuration file looks like:
{
   "Default Environment":{
      "CustomVariables":{
         "Token2":"value_from_custom2",
         "Token3":"value_from_custom3"
      },
      "ConfigChanges":[
         {
            "KeyName":"/configuration/appSettings/add[@key='TestKey1']",
            "Attribute":"value",
            "Value":"value_from_xpath"
         }
      ]
   }
}
If we’re going to do token-replacements over an App.settings file, the source file might look like:
<?xml version="1.0" encoding="utf-8" ?>
<configuration>
    <appSettings>
      <add key="TestKey1" value="__Token1__" />
      <add key="TestKey2" value="__Token2__" />
      <add key="TestKey3" value="__Token3__" />
      <add key="TestKey4" value="__Token4__" />
    </appSettings>
    <startup>
        <supportedRuntime version="v4.0" sku=".NETFramework,Version=v4.5.2" />
    </startup>
</configuration>
Since TestKey4 is not otherwise defined, it will either be replaced with itself (no net difference) or the value for an environment-variable named “Token4” if defined.
In my test situation, my build definition’s “Copy Files” task is copying the contents (“**\*”) of “$(Build.SourcesDirectory)\TestConsoleApplication\bin\Release” to “$(Build.ArtifactStagingDirectory)”. This is an example of the arguments to the “Tokenize with XPath/Regular expressions” task that I’ve added in my release-definition:
- Source filename: “$(Build.ArtifactStagingDirectory)\drop\App.config.template”
- Destination filename: “$(Build.ArtifactStagingDirectory)\drop\TestConsoleApplication.exe.config”
- Configuration Json filename: “$(Build.ArtifactStagingDirectory)\drop\TokenEnvironmentConfig.json”
Personally, I’d prefer that parsing this be a little stricter: fail if can’t parse as JSON, fail if any tokens can not be resolved, and optionally allow it to fail if any XPath specifications don’t match anything.
Additional Notes
-
The RELEASE_ENVIRONMENTNAME variable is usually defined and used to determine the current environment. However, if it isn’t defined then the default environment searched in the configuration file is “default”.
-
The
CustomVariablesandConfigChangesblocks don’t have to exist in the configuration file (won’t fail validation). What is there will be used. -
For debugging, I’ve had issues enabling logging verbosity in PowerShell (with VerbosePreference). It would be easier adjusting the tasks\Tokenizer\x.y.z\tokenize.ps1 module in your build-agent’s directory to change all the instances of “Write-Verbose” to “Write-Host”. The module provides a lot of useful messaging if you can get it to show.
-
In the current version of the task, it provides a PowerShell 3 script in addition to the original PS script. I get the following message on my system: ##[error]Index operation failed; the array index evaluated to null. I downloaded the source-code to the VSIX that is available in the Marketplace, adjusted it to not use the PS3 version of the script, repackaged the VSIX, uploaded it to my on-premise TFS, and, bam, the token-replacement worked perfectly. The PowerShell 3 script is broken.
TFS Release Management Build Agent Doesn’t Pickup Jobs
If your build tells you “Build Not started”, “Waiting for an available agent”, or “Waiting for an agent to be requested”, make sure that your agent is running (if as a service, then it’s called “VSO Agent”) as well as the “Visual Studio Team Foundation Background Job Agent” service. The latter feeds the former. In my case, I am using TFS 2015 and the latter appeared to be configured as “Automatic (Delayed Start)” but had to be configured as “Automatic” instead.
Uploading Release Management Tasks With a VSIX Extension Package
TFS 2015 lets you define build and release workflows comprised of discrete tasks. Although it provides a handful to you (build-specific, release-specific, general utility, etc..), you can also write your own “Extension Tasks” and upload them. I previously described how to use Microsoft’s tfx tool to upload a single task from the command-line.
You might also need to upload one or more tasks that have been packaged into a VSIX file (Microsoft’s Visual Studio Extension packaging format). These are essentially zip-files that have a manifest and one or more directories. In this case, those directories represent tasks (they each have a task.json file). Although you can probably do this from the command-line using the tfx tool, you can also use your TFS’s web UI to do it. Note that this process will need to be repeated for each collection that you’ll want the extension to be available in.
Click the “Shop” icon to open the corresponding menu and then click on “Browse of Extensions”:

Click on the “Manage extensions” button in the middle of the page. It’s not the same link/button as the previous one even if they have the same text:

Click on “Upload New Extension”. Browse to the VSIX file and upload it.

After, you’re presented with a list of installed extensions:

Observe that the extension populated on to the previous local-management screen. Click on it:

Now, click on “Install”:

After installation, the new tasks will be available within the lists of available tasks.
Adding a Task to Your On-Premise TFS 2015 Server
TFS 2015 embeds previous vNext functionality to provide you workflow-driven, scriptable builds. This is based on establishing discrete tasks that can be reused between your build definitions and release definitions as relevant.
You can extend the basic set of tasks, which, though sufficient for very simple builds and releases, might quickly become insufficient. New tasks are called “extension tasks”. Discussing how to create one is out of scope for this post so we’re assuming that you already have a path that describes a task. At the very least, there will be a task.json file in it.
What comes next?
- Install Microsoft’s “tfx” tool.
- Added support for “Basic Authentication” to your on-premise TFS’ IIS server.
- Enable Basic Authentication on that IIS server.
- Login to your TFS using the tfx tool.
- Upload task.
Instructions
1. Install Microsoft’s “tfx” tool
This is a cross-platform project that requires NodeJS to be installed locally. The TFS-CLI project is hosted here: https://github.com/Microsoft/tfs-cli.
To install:
npm install -g tfx-cli
2. Add support for “Basic Authentication” to your on-premise TFS’ IIS server
On a workstation flavor of Windows (in my case, Windows 8.1):
- Go to “Programs and Features” -> “Turn Windows features on or off”.
- Navigate down through the tree of features: “Internet Information Services” -> “World Wide Web Services” -> “Security”.
- Enable “Basic Authentication” and click “OK”.
If you’re running a server flavor of Windows you’ll have to update the “Web Server” role instead:
(https://github.com/Microsoft/tfs-cli/blob/master/docs/configureBasicAuth.md)

Make sure to close and re-open IIS Manager afterward.
3. Enable Basic Authentication in IIS
Under the application, click “Authentication”, right-click on “Basic Authentication”, and click “Enable”. Make sure you enable “Basic Authentication” under the application, not the site. Setting it on the site will be ineffectual.
4. Login to your TFS using the tfx tool
C:\>tfx login --auth-type basic
TFS Cross Platform Command Line Interface v0.3.20
Copyright Microsoft Corporation
> Service URL: http://localhost:8181/tfs/DefaultCollection
> Username: yourdomain\dustin.oprea
> Password:
Logged in successfully
5. Upload task
I tested using the “XLD” task, here:
Unzip and install by passing the directory path:
tfx build tasks upload --task-path xld
Now, if you go to your list of release tasks (where the XLD task ends-up), you’ll see it:


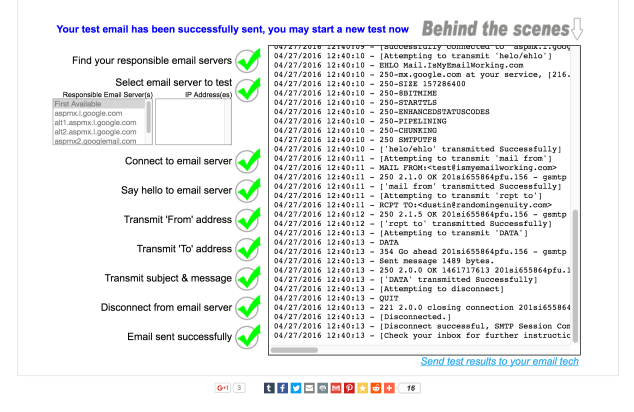
Testing Deliverability on Your Email Account
Here’s a site that allows you to easily debug resolution, server, and account issues given an email address:
It works exactly as expected:
Port Forwarding in Windows
Use the native netsh tool:
C:\>netsh interface portproxy add v4tov4 listenport=<local port> listenaddress=<local interface IP> connectport=<remote port> connectaddress=<remote IP or hostname>
Notice that you can forward to a hostname, not just an IP.
Embedded SQL
A nostalgic visit from the past: Embedded SQL, where you can inject live SQL directly into your C code.
EMBEDDED SQL IN C
Introduction to Pro*C
The second refers to such development using Oracle. Example from the second:
for (;;) {
    printf("Give student id number : ");
    scanf("%d", &id);
    EXEC SQL WHENEVER NOT FOUND GOTO notfound;
    EXEC SQL SELECT studentname INTO :st_name
             FROM   student
             WHERE  studentid = :id;
    printf("Name of student is %s.\n", st_name);
    continue;
notfound:
    printf("No record exists for id %d!\n", id);
}
It’s worth mentioning just to have some central place to search for it later.
Using XML-RPC with Magento
Sure, we could use a cushy SOAP library to communicate with Magento, but maybe you’d want to capitalize on the cacheability of XML-RPC, instead. Sure, we could use an XML-RPC library, but that would be less fun and, as engineers, we like knowing how stuff works. Magento is not for the faint of heart and knowing how to communicate with it at the low-level might be useful at some point.
import os
import json

import xml.etree.ElementTree as ET

import requests

# http://xmlrpc.scripting.com/spec.html

_HOSTNAME = os.environ['MAGENTO_HOSTNAME']
_USERNAME = os.environ['MAGENTO_USERNAME']
_PASSWORD = os.environ['MAGENTO_PASSWORD']

_URL = "http://" + _HOSTNAME + "/api/xmlrpc"

_HEADERS = {
    'Content-Type': 'text/xml',
}

def _pretty_print(results):
    print(json.dumps(
            results,
            sort_keys=True,
            indent=4,
            separators=(',', ': ')))

def _send_request(payload):
    r = requests.post(_URL, data=payload, headers=_HEADERS)
    r.raise_for_status()

    root = ET.fromstring(r.text)
    return root

def _send_array(session_id, method_name, args):

    data_parts = []
    for (type_name, value) in args:
        data_parts.append('<value><' + type_name + '>' + str(value) + '</' + type_name + '></value>')

    payload = """\
<?xml version='1.0'?>
<methodCall>
    <methodName>call</methodName>
    <params>
        <param>
            <value><string>""" + session_id + """\
</string></value>
        </param>
        <param>
            <value><string>""" + method_name + """\
</string></value>
        </param>
        <param>
            <value>
                <array>
                    <data>
                        """ + ''.join(data_parts) + """
                    </data>
                </array>
            </value>
        </param>
    </params>
</methodCall>
"""

    return _send_request(payload)

def _send_struct(session_id, method_name, args):
    struct_parts = []

    for (type_name, argument_name, argument_value) in args:
        struct_parts.append("<member><name>" + argument_name + "</name><value><" + type_name + ">" + str(argument_value) + "</" + type_name + "></value></member>")

    payload = """\
<?xml version='1.0'?>
<methodCall>
    <methodName>call</methodName>
    <params>
        <param>
            <value><string>""" + session_id + """\
</string></value>
        </param>
        <param>
            <value><string>""" + method_name + """\
</string></value>
        </param>
        <param>
            <value>
                <struct>
                    """ + ''.join(struct_parts) + """
                </struct>
            </value>
        </param>
    </params>
</methodCall>
"""

    return _send_request(payload)

def _send_login(args):
    param_parts = []
    for (type_name, value) in args:
        param_parts.append('<param><value><' + type_name + '>' + value + '</' + type_name + '></value></param>')

    payload = """\
<?xml version="1.0"?>
<methodCall>
    <methodName>login</methodName>
    <params>""" + ''.join(param_parts) + """\
</params>
</methodCall>
"""

    return _send_request(payload)


class XmlRpcFaultError(Exception):
    pass

def _distill(value_node):
    type_node = value_node[0]
    type_name = type_node.tag

    if type_name == 'nil':
        return None
    elif type_name in ('int', 'i4'):
        return int(type_node.text)
    elif type_name == 'boolean':
        return bool(type_node.text)
    elif type_name == 'double':
        return float(type_node.text)
    elif type_name == 'struct':
        values = {}
        for member_node in type_node:
            key = member_node.find('name').text

            value_node = member_node.find('value')
            value = _distill(value_node)

            values[key] = value

        return values
    elif type_name == 'array':
        flat = []
        for i, child_value_node in enumerate(type_node.findall('data/value')):
            flat.append(_distill(child_value_node))

        return flat
    elif type_name in ('string', 'dateTime.iso8601', 'base64'):
        return type_node.text
    else:
        raise ValueError("Invalid type: [{0}] [{1}]".format(type_name, type_node))

def _parse_response(root):
    if root.find('fault') is not None:
        for e in root.findall('fault/value/struct/member'):
            if e.find('name').text == 'faultString':
                message = e.find('value/string').text
                raise XmlRpcFaultError(message)

        raise ValueError("Malformed fault response")

    value_node = root.find('params/param/value')
    result = _distill(value_node)

    return result

def _main():
    args = [
        ('string', _USERNAME),
        ('string', _PASSWORD),
    ]

    root = _send_login(args)
    session_id = _parse_response(root)

    resource_name = 'catalog_product.info'

    args = [
        ('int', 'productId', '314'),
    ]

    root = _send_struct(session_id, resource_name, args)
    result = _parse_response(root)
    _pretty_print(result)

if __name__ == '__main__':
    _main()
Output:
{
    "apparel_type": "33",
    "categories": [
        "13"
    ],
    "category_ids": [
        "13"
    ],
    "color": "27",
    "country_of_manufacture": null,
    "created_at": "2013-03-05T00:48:15-05:00",
    "custom_design": null,
    "custom_design_from": null,
    "custom_design_to": null,
    "custom_layout_update": null,
    "description": "Two sash, convertible neckline with front ruffle detail. Unhemmed, visisble seams. Hidden side zipper. Unlined. Wool/elastane. Hand wash.",
    "fit": null,
    "gender": "94",
    "gift_message_available": null,
    "gift_wrapping_available": null,
    "gift_wrapping_price": null,
    "group_price": [],
    "has_options": "0",
    "image_label": null,
    "is_recurring": "0",
    "length": "82",
    "meta_description": null,
    "meta_keyword": null,
    "meta_title": null,
    "minimal_price": null,
    "msrp": null,
    "msrp_display_actual_price_type": "4",
    "msrp_enabled": "2",
    "name": "Convertible Dress",
    "news_from_date": "2013-03-01 00:00:00",
    "news_to_date": null,
    "occasion": "29",
    "old_id": null,
    "options_container": "container1",
    "page_layout": "one_column",
    "price": "340.0000",
    "product_id": "314",
    "recurring_profile": null,
    "required_options": "0",
    "set": "13",
    "short_description": "This all day dress has a flattering silhouette and a convertible neckline to suit your mood. Wear tied and tucked in a sailor knot, or reverse it for a high tied feminine bow.",
    "size": "72",
    "sku": "wsd017",
    "sleeve_length": "45",
    "small_image_label": null,
    "special_from_date": null,
    "special_price": null,
    "special_to_date": null,
    "status": "1",
    "tax_class_id": "2",
    "thumbnail_label": null,
    "tier_price": [],
    "type": "simple",
    "type_id": "simple",
    "updated_at": "2014-03-08 08:31:20",
    "url_key": "convertible-dress",
    "url_path": "convertible-dress-418.html",
    "visibility": "1",
    "websites": [
        "1"
    ],
    "weight": "1.0000"
}
You may download the code here.

You must be logged in to post a comment.